Showing posts with label 28mm. Show all posts

Thursday, 8 February 2018

Maida 1806


The battle of Maida was fought in Southern Italy in 1806.  It came about as a result of an amphibious landing in support of the local insurrection of the Italians.  The real life battle pitched two very even forces together, approximately division sized with minimal terrain.  This makes for a very good introductory game or just if you are in the mood for a short game. The British had a major victory in both history and our game using the Carnage and Glory Two system.  
Map of the Battle
Thanks to Napnuts for the photo
http://www.napnuts.com/maida_scen.htm

The line battle took a ninety degree shift in our game with Kempt successfully advancing on the British left flank and Digonet on the French Right flank.  The only spoiler for the French avance was the British 20th line lurking in the bushes and preventing the French from exploiting their gains. 

Victorious General Stuart overseeing his deployment
A powerful light infantry division on the left overseen by the dubious General Compere.

The British view of the Légere for most of the game.
Light Infantry Battalions on the French Right Flank


French Right Flank with cavalry and horse artillery.  British had no cavalry but a preponderance of artillery 3-1
Colonel Kempt advances on the British Right Flank...sweeping the French Légere before them.
The embarrassing Lowry Cole forms square...then line....then square again....then line...rince and repeat doing much to instill confidence in the men!
French attack on the British left flank.  Successful except for the presence of the 20th line lurking in the scrub.
The 20th line unleashes a devastating volley against a French Légere unit casing 149 casualties.


British and French advanced on their own respective rights causing the whole line of battle to reposition almost 90 degrees form the starting point.  

Royal Corsican Rangers (and Sicilian Volunteers) were the only rifle armed unit in the game ut spent must of their time chasing French Légere around the table. They were a small but mighty unit.
General Comperes last unit at endgame.  A 1,000 man strong French line unit, in ongoing back step to keep within skirmish range to good effect.  
The Valiant RossShire Buffs

The Rutlandshires await the advance of the Polish Italian Legion, who despite the encouragement of the incomparable General Luigi Peyri never make it.  His mortal leg wound did not help.

Stuart viewing a battle won


Thursday, 14 December 2017

Gross Gorschen 1813

Wow.  I can't believe its been over a year since I last posted.  The latest game to be played chez Duc was the battle of Gross-Gorschen 1813 with Carnage and Glory.  This was really the opening phase of the battle of Lutzen and I modified one of the General de Brigade scenarios to put it together.  It was a bit of a marathon game stretching over 4 or 5? sessions simply because the tenacious French would not give up the game even after substantial army morale loss.  Towards the end a gust of wind would case a morale check on the French units.  I finally called the game when their army morale sunk below 50%.  Prussian army morale was still above 75%.  Kuddos to Von Rod for a well done major Prussian victory.

Unfortunately it only occurred to me to take pictures near the end of the game.

                                Town of Gross-Gorschen after which the action was named.  This was the largest built up area consisting of two sectors each of which could hold a battalion.  Since the interior did not need to be defended, defending units could shoot up to 33% out of each wall rather than the usual 25%.  The French never lost possession of the town despite bombardment from three allied batteries and some infantry fire.

The first village lost to the Prussians without a fight after LaBoissiere's cavalry screening force in front of the village was swept away by superior numbers of allied cavalry.

The French advance on the Prussian flank as part of their "closing the door strategy", vacating one of their objective villages to do so.  Since the objective was to their rear, no real risk in doing so.....unless they fail! 

Prussian artillery prepares to blow "the door" off of its hinges with close range canister.

The critical point in the battle.  The hard suffering French have just received much needed reinforcements and have decided to immediately throw them into the battle for Kaja, the key objective village, occupied by a fresh unit of Prussian Grenadiers. Two columns advanced against them unsuccessfully taking ten to one loses, losing a colour and General Anthing to a mortal leg wound.  The remnants fled from the table. 

A close up of the valiant French charging to their doom!

Getting in the spirit of things a unit of Prussian Hussars charges to their doom against a newly deployed French battery

That's all for this time.  More games and pics soon!


Saturday, 19 December 2015

Tamai 1884 - An Inglorious Moment for Empire


Our battle of Tamai appeared to be a pyrrhic victory for the forces of Empire at the end of the day of battle.  Colonel Davis's square had been annihilated and Buller's Square was in disarray, however holding fast on heartbreak hill. 

Had Davis held on, Buller would have stood firm however the full dervish host was now unleashed upon him from three sides. At this time exhaustion started to overtake both sides and as the sun rose high in the sky toward full noon it started to become very, very hot!  At this time Mahsud Musa, the Dervish commander, received a mortal chest wound and the remainder of the army melted away, carrying their fallen brethren, and pulling away what remained of the shattered guns and looted supply of Davis's Brigade. 

The next day end of battle status showed an inconclusive action as most of the missing on both sides returned to the ranks. While this was not a British massacre it was certainly very bloody for them, much more than what would have been the norm.  No doubt the British press would have classified this as a stunning defeat. Now I don't want a totally realistic game as that would mean the Dervish side would win less than 10% of the time. At the same time I do want the balance to be fairly historical so that if the mob prevails they can savour their victory. Even while the battle was 15,000 Dervishes against 4,500 British, it was not uncommon for the British to inflict 10-20 casualties for every one of their own historically.

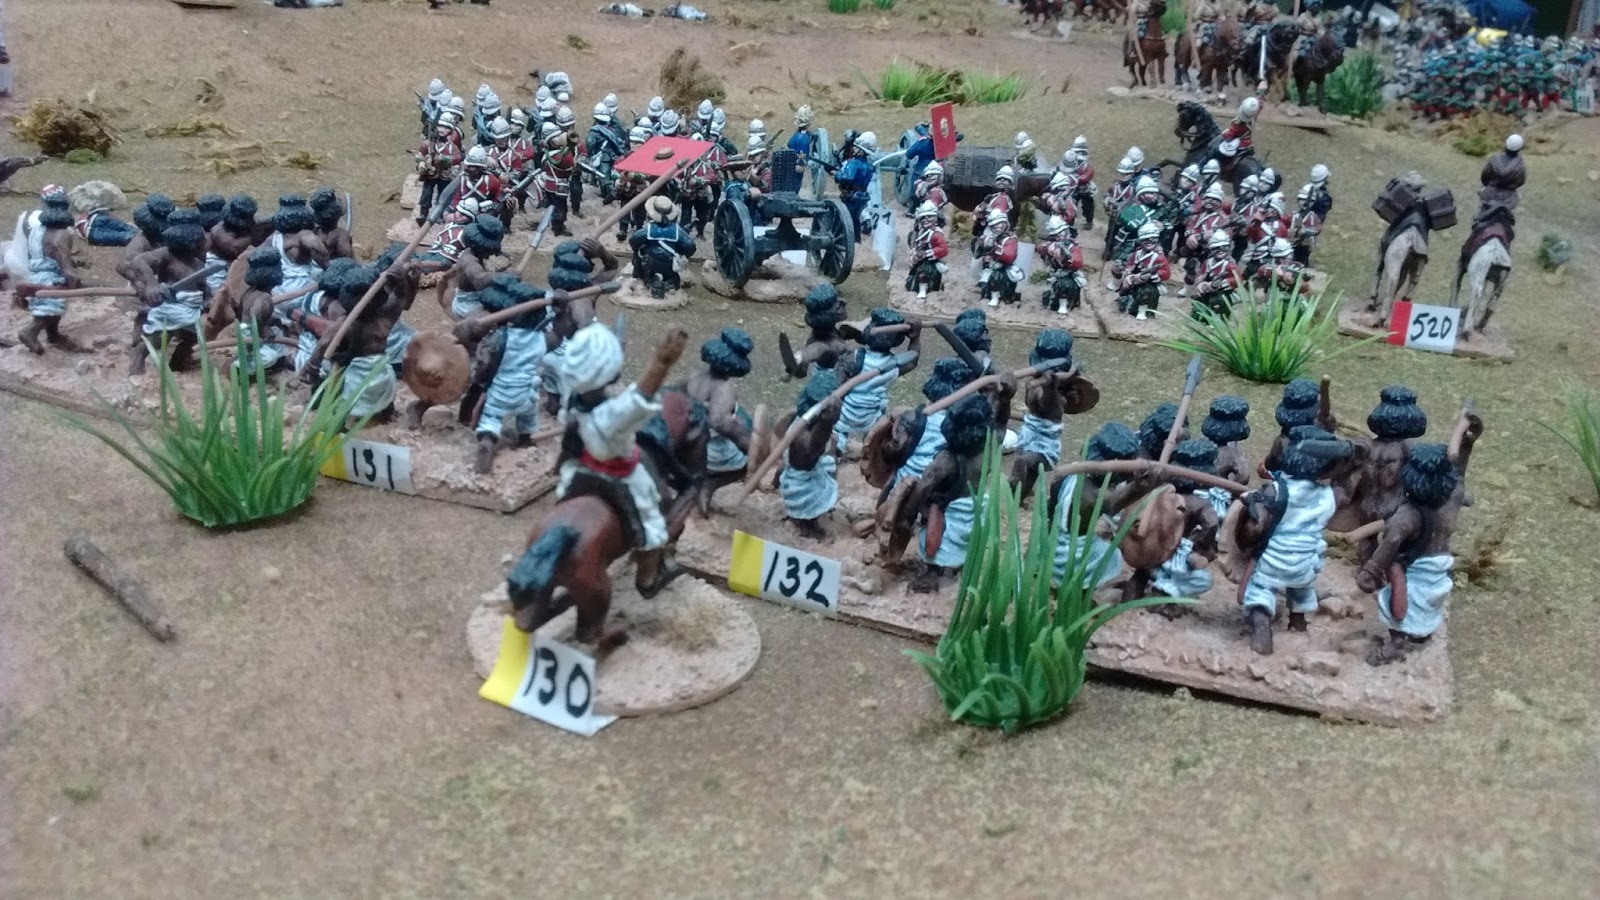
The Right Dervish wing, flushed with victory over Davis, swing around to try
and encircle Buller. Get those 9 Pounders in action men!

Heavy canister at close range flies into the mob cutting down the first wave
but not stopping them.  Two guns are lost as the battery limbers up and retreats.
The supply is also overrun,

Here is the order of battle that was used: 

Note: I used community names from a map of Sudan to name the Dervish units, leaders were named by using a current listing of generals in the Sudanese Army,,,except for the commander's name of Mahsud Musa which was known. Very colourful!!

Mahsud Musa - Attack
  [ 103] Generalleutnant Mahsud Musa - Active D+ [650 paces]
[ 101] Gezira Arabs                      0/ 592      C-
[ 103] Dervish Artillery                 0/  50 [ 2] D-
[ 104] Elephant Guns                     0/  30 [ 1] D-
    Brigade Abdel Rahim Mohammed Hussein - Attack
    [ 120] Abdel Rahim Mohammed Hussein - Active C- [300 paces]
[ 121] Kosti Beja Rub                    0/ 782      C+
[ 122] Wad Madani Beja Rub               0/ 813      C 
[ 123] Quadarif Ansar Rub                0/1042      D+
[ 124] Fashir Ansar Rub                  0/ 810      D 
[ 125] Kosti Jyhadiya                    0/ 105      D 
[ 126] Wad Madani Jyhadiya               0/ 102      E+
[ 127] Quadarif  Jyhadiya                0/ 103      D 
[ 128] Fashir Jyhadiya                   0/ 103      C-
[ 129] Daen Cavalry                      0/ 400      D-
    Brigade Omar Hassan Ahmad al-Bashir - Attack
    [ 110] Omar Hassan Ahmad al-Bashir - Active C+ [500 paces]
[ 111] Nyala Beja Rub                    0/ 775      B-
[ 112] Bahri Beja Rub                    0/ 991      C 
[ 113] Khassala Ansar Rub                0/ 825      D+
[ 114] Ubayyid Ansar Rub                 0/ 766      C-
[ 115] Nyala Jihadiya                    0/ 103      D 
[ 116] Bahri Jihadiya                    0/ 100      E+
[ 117] Khassala Jihadiya                 0/ 103      D 
[ 118] Ubayyid Jihadiya                  0/  99      D 
[ 119] Baggara Cavalry                   0/ 414      D 
    Brigade Mustapha Osman Obeid Salim - Attack
    [ 130] Mustapha Osman Obeid Salim - Active C+ [300 paces]
[ 131] Damazin Beja Rub                  0/ 802      B-
[ 132] Geneina Beja Rub                  0/ 824      D+
[ 133] Rabak Ansar Rub                   0/ 839      D+
[ 134] Damazin Jyhadiya                  0/ 100      D+
[ 135] Rabak Jyhadiya                    0/ 105      D-
[ 136] Geneina Jyhadiya                  0/  98      D+
[ 137] Sennar Camelry                    0/ 305      D-
    Brigade Ibrahim Aboud - Attack
    [ 140] Ibrahim Aboud - Active B [500 paces]
[ 141] Managil Beja Rub                  0/ 791      C-
[ 142] Nahud Beja Rub                    0/ 837      C 
[ 143] Damir Asar Rub                    0/ 824      C-
[ 144] Managil Jyhadiya                  0/ 101      D+
[ 145] Nahud Jyhadiya                    0/ 102      D-
[ 146] Damir Jyhadiya                    0/  99      E+
[ 147] Atbara Camelry                    0/ 301      D-

Strengths:
losses/active
     0/ 13736 Sword and Spear
     0/  1420 Sabres
     0/    80 Artillerists
     0/     3 Cannon

     0/ 15236 Total of all arms
            8 Standards present 

Division Sir Gerald Graham VC - Attack
  [ 502] General de Division Sir Gerald Graham VC - Active B+ [950 paces]
[ 508] Bashi Bazouk Scouts               0/  48      D+

    Staff Fred Barnaby
    [ 540] Colonel Fred Barnaby - Active B [950 paces]
[ 540] Col Fred Barnaby's Shotgun        0/  25      B+

    Brigade Sir Herbert Stewart KCB - Attack
    [ 510] General de Brigade Sir Herbert Stewart KCB - Active B [450 paces]
[ 521] Naval Brigade                     0/ 190      B 
[ 511] 2nd Dragoons                      0/ 190      B 
[ 512] Bengal Lancers                    0/ 199      A-
[ 528] RA Screw Gun                      0/ 100 [ 4] B-

    Brigade Sir Redvers Buller - Attack
    [ 520] Colonel Sir Redvers Buller - Active B [450 paces]
[ 531] 3rd Bombay Native Infantry        0/ 391      C 
[ 532] 7th Bombay Native Infantry        0/ 385      C 
[ 533] Camel Corps                       0/ 411      A-
[ 534] Yorks and Lancs                   0/ 405      B 
[ 526] Royal Artillery, Bty A RML        0/  97 [ 4] B-
[ 535] Sikh Screw Gun                    0/ 114 [ 5] B-
[ 529] Mule Supply Caravan I             0/  63      D 
[ 518] Camel Supply Caravan I            0/  69      C 

    Brigade Davis - Attack
    [ 530] Colonel Davis - Active B- [500 paces]
[ 527] RA 9lber                          0/  99 [ 4] B-
[ 522] KRRC                              0/ 390      A-
[ 523] Royal Irish Fusiliers             0/ 415      B 
[ 524] Royal Warwickshire Fusiliers      0/ 381      B+
[ 525] The Black Watch                   0/ 413      A-
[ 506] Naval Nordenfelt                  0/ 105 [ 4] B 
[ 539] Mule Supply Caravan II            0/  63      D+
[ 520] Camel Supply Caravan II           0/  69      C 

Strengths:
losses/active
     0/  3532 Bayonets
     0/   575 Sabres
     0/   515 Artillerists
     0/    21 Cannon

     0/  4622 Total of all arms


Meanwhile the stoic Guards Camel Corps (aka the "Posties") pour volley after
volley into Masud Musa's Arab Guard.  They hold fast but are finally wear

Final battle results can be found here:

The Army of Allah has suffered losses of:
[ 32%]   5095 men of all arms
   incl.[ 20%]   3266 prisoners of all arms

[ 32%]   4617 Sword and Spear
[ 31%]    449 sabres
[ 12%]     29 artillerists
                    2 cannon[s] lost
Honors: [ 119] Baggara Cavalry

Losses include 3 standard[s]:
        [ 101] Gezira Arabs [1]
        [ 112] Bahri Beja Rub [1]
        [ 119] Baggara Cavalry [1]

Losses include 2 Leaders[s]:
        [ 103] Mahsud Musa - Mortally wounded
        [ 110] Omar Hassan Ahmad al-Bashir - Captured

The Suakin Field Force has suffered losses of:
[ 32%]   1547 men of all arms
   incl.[ 17%]    813 prisoners of all arms

[ 34%]   1223 bayonets
[ 17%]     98 sabres
[ 33%]    226 artillerists
                   11 cannon[s] lost
Honors: [ 512] Bengal Lancers

Losses include 2 General[s]:
        [ 540] Fred Barnaby - Severely wounded
        [ 530] Davis - Severely wounded

 Indecisive skirmish in rough terrain.
Carnage and Glory 2 worked very well for this period even though it was not designed for it.  The ability to define troop types and weapon's allows a game designer much flexibility to achieve their scenario objective.  Here are a couple of things that needed tweaking and are reflected in my rule adaptations.

The Imperial cavalry was much too powerful when attacking sword and spear.  The minimal damage done to the attackers by spears (revolvers) usually meant that the mass unit would flee in the fire phase.  Quite often they were taken in flank but hey...who are dervishes to be worrying about flanks?  Even a 48 man unit of Bashi Bazouk scouts managed to put at least three units to rout...(2400 sword and spear).  One problem was that I forgot to mention to the dervishes that they could attempt to go prone against cavalry (except lancers) and the cavalry would ride right over them without causing damage. Historically, this was a common tactic of the dervishes as the horses would avoid the prone bodies but it would not protect them from lancers.  Furthermore I would not allow foot to charge horse.  Some of the players argued against that and in retrospect Dervish Mass Units will be able to do so in a quite medieval manner (according to Ed).  While that won't prevent extreme results by cavalry it will give them something to think about if there are other mass units nearby. 

British Dragoons hold Buller's flank.  There will be no encirclement.
The Dervishes were a little too successful in breaking into the squares.  It was not easy but it was not too hard either. Once the square was broken the British could be picked off by overwhelming numbers. I rated the British very highly but needed to go back and bump them up yet again.  Firepower also seemed insufficient to stop many dervish charges.  I was trying to figure out which formation, open column or closed column would be more susceptible to fire. I assumed that would be closed column and did some tests but there did not appear to be any difference in casualty rate.  I had originally decided an Open Column would best reflect a loose dervish mass, but found it to be not enough of a target to make the Imperial firepower as effective as it should be. The answer seemed to be to have the Dervishes in closed column however, that did not appear to make for a more susceptible target.  There does not seem to be a good solution to this from a formation point of view but I did go back and make sure all British had Excellent Fire.  That should help. As an alternative, I have considered using different range sticks for movement and fire.  I am currently using 1:50 for everything but could limit it to just unit frontage and movement with firing using a 1:37.5 stick or 1:25 to reflect the 14 years of weapons development that had taken place since 1870 for which the rules were designed.  

Further research on the web (Google Books) finds a Contemporary Analysis, Starting on page 343 of the Martini-Henry (1871) vs the Snider-Enfield (1853) and the Chassepot (1866).  It show the Henry to have three times the accuracy and twice the rapidity of fire. Clearly the minor tweaks above that I envisaged for the British Army lists are not enough and not necessary.  British Rifle fire should be done at either 1:37.5 0r 1:25 vs.1:50 for all else. 

Furthermore I have created an ability for troops in square who have recoiled to return to their position in the square even though they should not be able to move...so long as the dervish have not moved first. I also bumped up the caliber of the British 9 pounders from 6#RML to 8#RML and have increased the battery size from 4 to 6 guns. 

In real life Dervish skirmishing was not very effective. I feel that in the game they were causing many more casualties than would have been the case...even though at the end of the day, they were still very ineffective!  Jury is still out on that one. 

More waves of dervish advance from the right flank after
dealing with Davis, finishing off any wounded infidels as they go.


Captain Ritchie of the Yorks and Lancs offers words of encouragement to
his men.  "Steady Chaps". 

The Last Fresh Reserve barring the way to he British Camp.  All appears lost
when the Dervish army abruptly turns away and vanishes as quickly as they came.

"Ere's to you Fuzzi-Wuzzi!"


Sunday, 13 December 2015

Tamai 1884 - Part II & III


Tamai continued on for a couple more game sessions with the action really only beginning in session II.  The Dervishes did a gradual encirclement of Colonel Davis's square which, after much pressure, resulted in it's complete destruction. Colonel Buller's square held strong during session II but by the end of session III was in complete disarray.  Fortunately this dervish wing was not able to bring as much pressure to bear on Buller's force and it was able to hold its own.  By the end of the third session Buller's column was attempting to redeploy in an all round defence on the hill in front of the British base camp to await the onslought of the full dervish host...or what was left of it. The steady trickle of bloodied, redcoat refugees from Davis's square suggested a taste of the drama about to unfold.


This picture shows the beginning of the dervish encirclement of Davis.

The Royal Irish Fusiliers prepare for the first human wave attacks

The Black Watch were facing Buller's square and did not come
 under any pressure until the square collapsed.

See the sneaky dervishes giving the square a wide berth
as they move around the flank.

The Dervish Camelry now gets involved.

Meanwhile Buller's square continues to be sniped at but holds firm.

The 7th Bombay Native Infantry.  There were no Indian troops at the real battle.


Work continues in the British basecamp, now protected by improved Zaribas

Valiant Colonel Redvers Buller confronts an angry Dervish elder who shakes his fist at him.
Go home infidel.  You are not wanted here!  30mm Willie figure form the 70's.

A never ending mass of dervishes approach Davis.

The Dervish Chorus Line....alalalala

The rear of Davis's square is punctured.

The British are now in disarray, pouring a panicky volley onto their tormentors.  

Captain O'Malley of the Royal Irish Fusiliers  keeps a stiff upper lip.


Another shot of Howard's fine Zaribas

General Graham monitors the debacle in the valley below.  Colonel Fred Barnaby
is dispatched by General Graham to take control of the situation but is quickly wounded
and out of action.. You can see his lone figure in blue just before a mahdist hacked
off his left hand. Burnaby punched the offending Mahdist out cold with a right cross and calmly picked
up his unused shotgun and trundled off the field for medical attention.

Its said that the severed hand was eventually covered in gold leaf and presented by Mahsud Musa as a trophy to
the Holy One...the Mahdi.

See also a journalist from the London Times quickly sketches the action.
This will be front page news.  Read all about it! 

Captain Mad Dog Fielding of the Royal Warwickshires implores his men
to advance against the dervish mass.

Dervish success is bought with heavy casualties.  Dervish Army morale
is starting to crack.  A few troops begin to leave the field......
however the dervishes can afford them. 

The red line gets thinner...


....and thinner

The front of the square continues to hold...for now.  The boys in green
are the King's Royal Rifle Corps (KRRC) affectionately know as
Colonel Saunder's KFCs 

Fighting for their lives.  

Finally the dervish mass troops slam into Buller.  The Camel Corps repulses
several waves.

The two dozen devils of the Bashi Bazouk Scout Troop rout thousands
of fatigued mass dervish troops to rout before becoming
engulfed in a swarm of jihadiya riflemen.


By now Davis's square has totally collapsed with the British
fighting back to back where possible.  

Here they come again!!

The encirclement is now complete.

The last moments of B Co. 9th Royal Artillery Regt.

Colonel Stewart's Cavalry arrive from
their meandering tour. Too late to save the day.

Buller's square is also cracked open but there is no panic and the troops hold firm.

The Yorks and Lancs prepare to deliver another volley into  their
worthy opponents.

Out of frustration, General Graham orders the Sikhs to indiscriminately
bombard the swirling mass in the valley below.

The remnants  of Davis's command form
battalion squares in a last stand effort.

Somewhere in the valley a bugle began to sound the call for retreat....nothing more was then heard from them....

Tune in for the conclusion of Tamai.